| Sagefox gets the treatment |
Our travel partners, Ed and Suzanne, have finally decided to take my advise and install a Subaru engine in their 1985 Vanagon Weekender, "Sagefox".
The weekend of June 10 and 11, 2000, I helped Ed install the Subaru engine. During the previous weeks Ed had recieved the KEP adapter kit, made up his wiring harness and installed new crank and cam seals on the engine. He also replaced the timing belt.
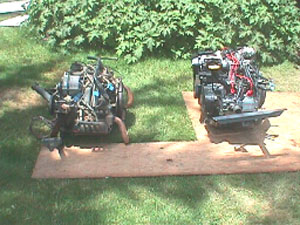
By the time I got there he had the original VW engine removed and had cleaned and painted the engine compartment. Ed is meticulous and as we worked I tried to take pictures of things that I didn't take pictures of when I installed my Subaru.
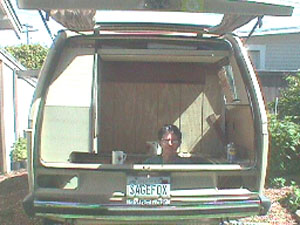 |
Here we have Eddie happily ensconced and taking care of details. He installed a temporary wall panel just ahead of the engine compartment to keep the cat out of the rest of the Vanagon while we worked.
 |
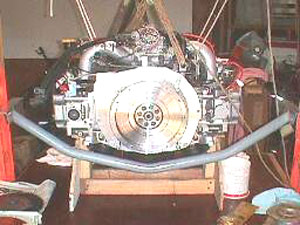 |
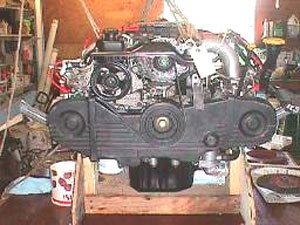
Here is the front and backside of the waiting 1991 Subaru Legacy 2.2 engine. The work behind the front timing belt cover has been done and the adaptor plate, flywheel and engine cross member from KEP are installed.
 |
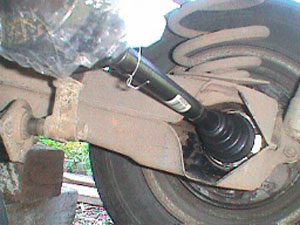 |
As I said, Ed is meticulous. All new radiator hoses and heater hoses. New wheel bearings all round and new axle/CV joint assemblies. Plus, new brakes, cylinders, springs and hardware.
 |
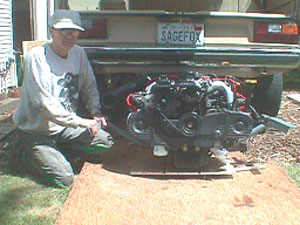
So. Here we go. Out with the old. In with the new.
 |
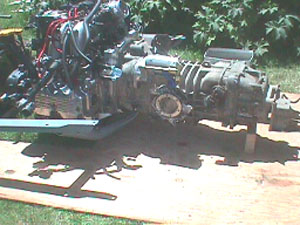 |
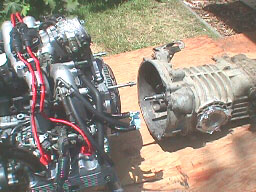
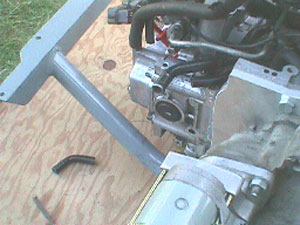
First, mate up the Subaru to the Vanagon transaxle and install the new geared starter.
 |
 |
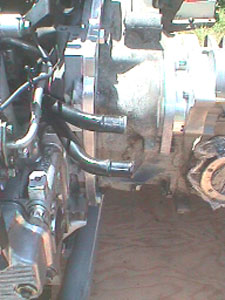
We modified the lower heater pipe on the engine by cutting off the piece you see laying on the plywood. This needs to be done because it gets very busy in the right front corner of the engine compartment where the heater hoses and radiator hoses meet.
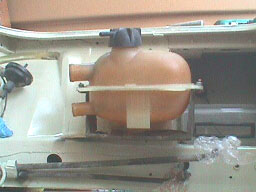 |
Ah, the burp tank!
Here it has been removed from the rear of the engine compartment
and re-installed on the right side. We used its original metal
mounting bracket but sectioned the bracket down about an inch and
a half to lower the height so it will clear the hatch when
screwed to the metal flange that was already sticking out on the
right side of the engine compartment - the flange that use to
support the VW air filter box. We also positioned it aft enough
to enable us to get the plumbing to the burp tank without having
to go through a "trombone" like lash-up of 90 degree
elbows like I did on my conversion.
 |
Sunday morning and confidence is high. We roll the engine and tranny under the vanagon and raise the tranny end high enough to install the front tranny bolt. Then raise the rear of the engine until the engine cross member angle irons meet the vanagon frame. We let the engine mount assembly dictate where the bolt holes will go into the frame. Two of the original engine mounting bolt holes show up through the pre drilled engine carrier but are half a hole off. We elect to drill new holes in locations next to the old holes - three each side.
I had "forced" the pre-drilled holes in the KEP cross member "match" the existing holes in my vanagon frame and later discovered that by doing so I had "loaded" the Subaru engine rubber mounts and located the crossmember so close to my exhaust cross over pipe that they were against each other and made noise during acceleration which I thought was my shift rod rattling! Dick and Tom Myers were the ones to finally notice my problem. We "relaxed" my Subaru engine mounts by re-locating the engine carrier to where it "wanted" to be and drilling new holes into the frame.
 |
Once we had Ed's engine up and bolted into place we put the exhaust manifold in place and discovered that Hobert Kennedy has evidently modified the exhaust or the engine cross member because there is now over an inch of clearance between them!!
 |
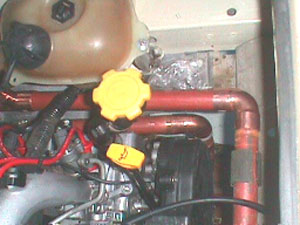 |
Okay. Back to the burp tank and the coolant plumbing. The image on the left shows how by positioning the burp tank aft a bit and cutting off a half inch of the 90 degree elbow and half an inch off the left side of the "T" and using a very "close" nipple we were able to conserve enough length to be able to make the upright pipe from the "T" to do a very nice 90 and connect right into the lower fitting on the burp tank. The upper fitting on the burp tank is where the Kennedy valve for pressurizing the system will be attached. Also notice how busy the hoses get in the right front corner of the engine compartment as mentioned earlier.
In the right image you can see how the copper pipe makes a 90 degree bend and heads for the outlet of the Subaru engine. This is the pipe you want to keep level while traveling through the engine compartment so the "T" will pick off any bubbles and put them up in the burp tank. The copper pipe you see below the outlet pipe is the inlet pipe going down to the thermostat end of the the Subaru water pump.
No, the fore and aft copper pipes are not bent. I just didn't shoot these two pictures exactly straight to each other!
Once again, here is my drawing of the routing of the coolant pipes....
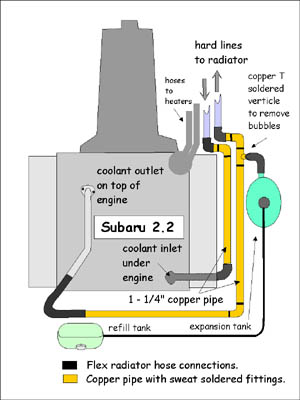 |
My drawing shows that the copper "T" for the "burp" tank and the copper "90" that goes to the Vanagon radiator pipe had to be very close coupled.
Anyway.
Hopefully Ed will be able to wrap it up this week because we all are going camping for several days during this coming weekend. It would be way cool if we had a convoy of two Subaru powered Vanagons.
We noticed a difference between Ed's exhaust header and mine. One difference was that his cleared the engine crossmember better than mine and the second was that Kennedy had added two additional triangular shaped pieces of metal as gussets, welded in place, to probably help keep cracks from developing. Mine, without gussets, has developed some cracks.
 |
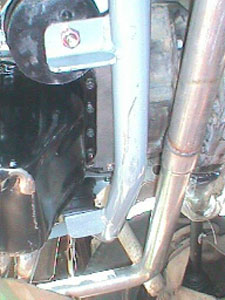
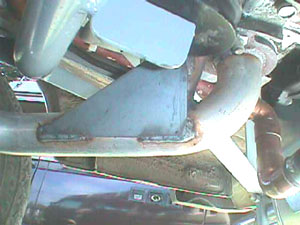
Okay, get your orientation correct. This is looking from under the rear bumper up and forward on the driver side. See the left rear tire, shock, half shaft? Okay. Then the exhaust crossover from the passenger side (nice and shiny cause Ed has hardly put any miles on at this point. Then see the gray engine crossmember. Then, above that the two pipes coming from the Subaru exhaust ports on the driver's side. The additional gusset is welded to the two pipes from the exhaust ports and also welded to two places on the main exhaust pipe going to the cat. Evidently to stop any possible fore and aft motion at the weld interfaces.
 |
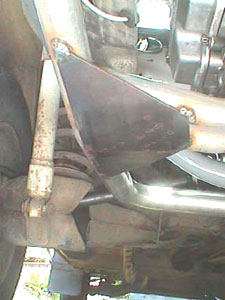
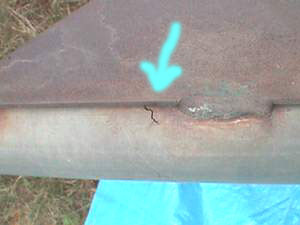
Okay. This is the added gusset on the passenger side of the exhaust header. It is like you had your head on the ground under the oil pan and was looking up and out towards the passenger side of the vanagon. See the rear tire to the left side of the picture? See my Vanaru parked beside Ed's Vanagon with Ed's Vanagon reflected in my Vanaru...? Could be art!
But hey, it ain't easy getting good pictures of this without putting the Vanagon up on a lift!
Anyway, the main idea here is that the gusset are welded to the exhaust pipe and to the forward-most exhaust port pipe from the engine. The angle iron on the engine crossmember that attaches to the rubber engine mount blocks the view of the third weld. But again, the idea is to stop fore and aft movement... probably any kind of vibration, for that matter.
But wait.
Over time Ed's exhaust did cracked too.
 |
Kennedy announced they had found a new exhaust pipe maker and were offering a replacement exhaust for $40.00 if you sent them your old cracked exhaust. Ed and I ordered replacements.
 |
 |
 |
 |
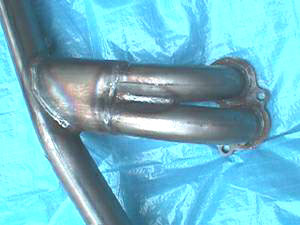
Here is the replacement Ed got.
In the top left image you see the new and old exhaust. The new is the top one.
In the top right image you see the welding for the new exhaust.
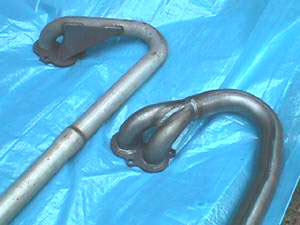
The bottom left you have the old exhaust at the top and the new at the bottom.
In the lower right image you see the old at the bottom and the new at the top.
The new exhaust pipe is larger in diameter. The welds look great and I think the cracking problem is finally solved.
My original exhaust has also cracked and I am waiting for my new version.
Click here for the continuing Vanagon conversion story.
Click here to return to Vanagon Conversion page