Additions to Vanaru
The Subaru engine transplant has been trouble free and so my thoughts have turned to making our camping experience more enjoyable.
Lights!
My 1984 Wolfy camper has only one light in the camping area. It is a stock VW lighting fixture located above the storage bins and just ahead of the closet on the drivers side. A nice light but only good for the person sitting on the drivers side of the rear bench seat. It does not cast light into the cooking pots on the stove and it doesn't afford light to the person sitting in the swiveled passenger seat, trying to read a book.
I wanted more light but I didn't want to add much draw to my battery (I have not installed an auxiliary battery yet).
I became interested in LED (Light Emitting Diodes) as a possibility. I found that Real Goods has them, www.realgoods.com but now they no longer (last time I looked) list them on their webpage. Anyway, I drove over to their store in Hopland, Ca. and took a look. I decided to buy some even though it seemed a high price for LED fixtures, forty dollars apiece! Oh well, what isn't high priced now a daze?
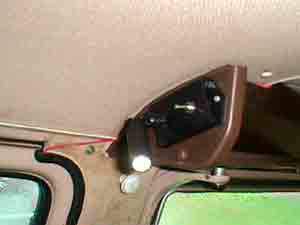
I bought two "Comet" fixtures, containing 3 LEDs each for over the stove and one "Cabin Light", containing 3 LEDs for above the passenger seat.
|
|
Two Comet lights above |
One adjustable Cabin Light above |
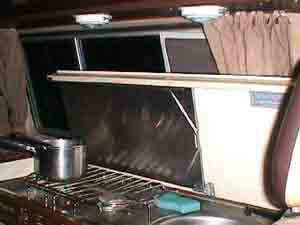
I don't know if I am really happy with them or not. I will have to do some more camping to get use to them. They cast a very cold white light. Not warm and friendly like the stock light. But, they do light up the stove and sink and I can read a book now while sitting in the swiveled passenger seat.
They do not light up the area. They only light up what they are aimed at.
On the plus side, they will probably out-last my Vanagon and I think I could leave them on for a week and not draw down the battery beyond starting voltage.
Check out http://www.hollysolar.com/lowvolt.htm if your are interested in this kind of additional lighting.
Two Birds with one stone.
You know how we all love that totally bogus dashboard on our beloved Vanagons. Yeah, the one that slopes toward your lap at an angle. All that wasted space except for the ash tray and that wee flat area in front of the passenger?
I kept looking at that area and thinking about it. Finally I had had enough and got together with my woodworker friend Stefan. We took some measurements and also measured the angle of the dash and then Stefan went to work. He had a nice piece of oak and he made me an oak platform that fits on part of my dashboard and converts it into a large flat area. I screwed it to my dashboard with three screws and installed wood trim around the front edge and sides. (Hey! It's my Vanagon and if I want to drill some holes in it to make life better - I will). Then I bought a small roll of that non skid stuff that is used to line tool boxes and covered the new "level" dashboard. Things stay put rather well during normal driving. Coffee cups, books, sunglasses, toys, etc.
Anyway, it's great!
I know, I know, it probably would not pass OSHA safety standards because it is "hard" wood but try banging your head on the edge of the original Vanagon dashboard and tell me it would feel better :-)
A couple months later I was in a store and there were some nice stainless steel coffee cups for sale, the kind with the lid used for keeping coffee hot and non-spilling. Hmm? They were kind of strange in that the top half of the cup had a larger diameter than the bottom half. I knew they would easily tip over but I got to thinking about a cup holder design for them.
I bought two - one for my traveling partner Lolli and one for me.
When I got home I removed my wooden dashboard and made two partial holes in the wood to hold my new coffee cups.
I re-installed it back in the Vanagon and.....
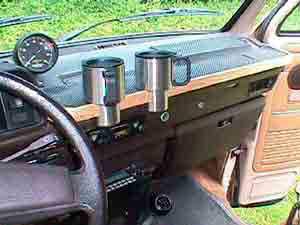 |
Is this cool - or what? |
The eternal search for cup holders and where to put them is finally over!!
Next Item
 |
Power inverter. 12 volts to 110. |
I bought this power inverter and am thinking about where I want to place it. So far I have just used it on the dashboard to grind coffee beans.
Always something to think about!
But, not for long!
During our Winter Break trip to Death Valley an electrical static shock killed the above inverter.
I was able to find this replacement in Blyth, Ca.
 |
It is a Maxx Power inverter made by Vector.
700 watts with a peak or surge capacity of 1,400 watts.
I paid around $100.00 including tax.
I mounted it behind and below the passenger
seat and wired it directly to the battery.
It has three outlets for plugging stuff into. Multi-tasking
anyone?
It seems to be much more efficient at converting 12 volts to 110
volts than the small dash model.
Awning?
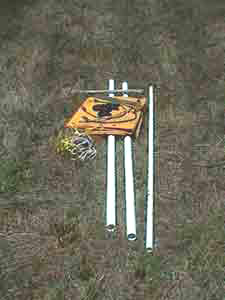 |
Okay. What we have here are the makings for the awning I invented. I had a yellow tarp that had been hanging around for a while. I don't even remember where I originally aquired it from. Then, three pieces of PCV pipe cut about 6 feet long. One is smaller than the other two so it will slip inside one of the others to conserve space. (I carry them up under the pop top. I removed the upstairs bed.) Then, there are three bungie cords, three spring clamps I bought from Harbor Freight and Garbage, three pieces of rope and three pieces of 1/2 inch rebar. And, my medium sized axe with which to pound the rebar into the ground.
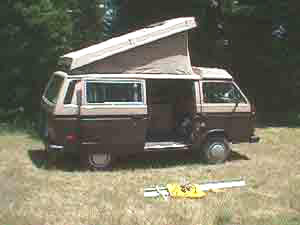 |
Here we go. I clamp the tarp to the rain gutter in three places with the spring clamps. Then stretch out the tarp from the middle, hook one end of a bungee cord through a grommet on the tarp and over the end of one of the PVC pipes. Then, using a rope, extend to a length of rebar which I pound into the ground. Repeat the process with the two ends of the tarp and...
 |
Voila! We be camping!
Hood ornament?
Hmmm?
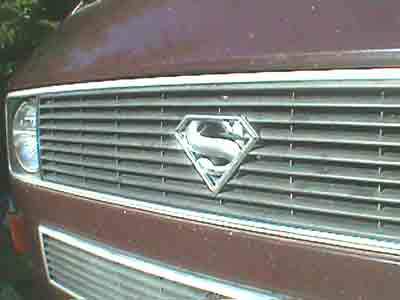 |
Maybe you noticed in the last awning image I had made a new emblem for my grill.
Yes! Supervan has arrived!
I found a Superman logo by typing
"Superman logo" into my search engine,
chose one of the images, copied it, massaged it in Corel Draw and
made it the size I wanted.
Then I traced it onto a sheet of 1/16th thick aluminum using a
steel scribe.
I then cut it out using small drills, saber saw and finished it
with pattern files.
Then I built up the shape into a 3-D form by using a two part
metal paste called Belzona.
I then smoothed it and applied a coat of Chrome paint. I removed
the original VW emblem
and centered and attached this emblem with two screws.
Yes, Vanaru needed something to signify it's change to Subaru power!!
November 25, 2000
Gas tank time.
I have been leaving a larger and larger puddle behind when I fill up at a gas station.
Via the Vanagon.com list I have discovered that I am not the only one. Evidently, overtime, the grommets and hoses connecting the gas tank, via the cross-over pipe, to the vent tanks located in each wheel-well become dried out and no longer seal the gas in.
I ordered the complete gas tank retro-fit set
from Ken Wilfy KENWILFY@aol.com
($63.00)
This includes four grommets, some gas line, the plastic crossover
pipe and a bunch of stainless hose clamps.
He has a webpage, www.vanagain.com where you can order parts and he also has instructions on how to do this job and other typical Vanagon repairs.
I received the parts and with the help of Ed McKinley we drained my gas tank and then lowered it.
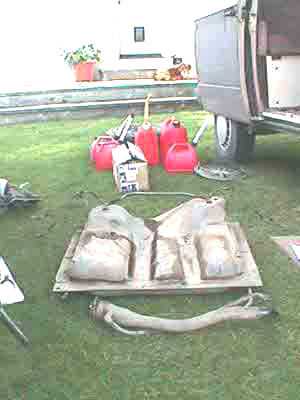 |
Boy, the German Engineers sure do know how to
design a complicated tank and system.
The filler pipe is in the foreground. The small plastic vent
crossover pipe can be seen on the tank. The tank is laying on the
ground backwards to how it came out of the Vanagon.
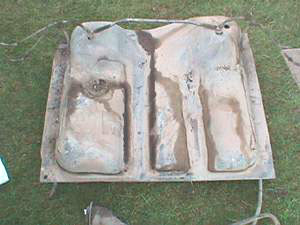 |
We removed the various grommets and sending unit, covered the holes with duct tape to keep water out, and then washed the exterior of the tank. No rust to deal with so we installed the new grommets and cross over pipe and then re-installed the tank in the Vanagon. It took about three hours.
I filled up at the local gas station and there were.... no leaks!!
I think my gas mileage will increase! Before this fix I noticed the first half of my gas gauge would drop rather quickly. The lower half of the gauge would last much longer!
(Note: Average gas milage has increased from 18 mpg to 19.5 mpg!)
Life is good.
Click here for the continuing story.
Click here to return to Vanagon Conversion page